
Playlists and Sharing
| Welcome to Playlists on Flow Capture | Full introduction from the Flow Capture team. |
| An overview of Playlists. | |
| An overview of Shares. | |
| How to take your Playlist and Share it to Recipients. | |
| A streamlined way to create Shares quickly. | |
| An overview of Share management. | |
| New Feature: "Allow Screenshot Downloads" |
|
|
|
|
|
|

Welcome!
Whilst Playlists have always existed in Flow Capture we're giving them a whole new lease on life through our New Playlist Experience.
In their original form, Playlists were originally created to collate content across multiple locations for live collaboration in Flow Capture Rooms - with playback being limited to those sessions.
Today Playlists have been redesigned and rethought - empowering you to curate and collate content across locations for collaboration, playback and distribution.
Click below to watch an overview of the new Playlist Experience.
For additional tutorial videos on the new Playlist Experience, click here
Reintroducing: Playlists
A playlist allows you to collate assets from different locations across Flow Capture. This allows for playback of those assets for private review, as well as becoming available for distribution in the form of a Share.
Playlists - Creating a Playlist
To get started with Playlists, select some assets within Flow Capture on the Assets Tab and then navigate to Playlists in the Menu Bar.
- Enter a Playlist Name to make it unique amongst your current (and future) Playlists. Please note that at present, Playlist names have a 44 character limit.
- Enter a Playlist Description for yourself, to remember why you created this Playlist.⠀Once Created, a Playlist will become available in the Playlists Column in Assets.
- All Playlists > My Playlists > My New Playlist
Playlists - Adding Assets and Editing a Playlist
- To Add Assets to a Playlist:
- Select Asset(s).
- Head to the Menu bar and choose Add to Playlist.
- Select an existing Playlist, or create a new one.
- (Success! - Assets Added to Playlist).
You can also add an asset to a Playlist when in the Viewer by clicking the Action Menu icon in the upper right hand corner:

Playlists - Previewing Playlists
To preview the Playlists that you've created, just click on the Playlists tab on the left hand navigation bar. From here, you'll be able to see all of your Active and Archived Playlists, as well as any Quick Playlists you've created. (See below for more info on Quick Shares).
You can also filter your Playlists by Project, as well as which Playlists have been shared with others and which ones haven't.
Your Playlists are also sortable by Name or Date created, in ascending or descending order.
To preview a Playlist, you'll need to click on the asset thumbnail panel of that Playlist. Clicking on the title card of that Playlist will simply select the Playlist itself.
The screen capture below highlights the asset thumbnail in panel in red, and the title card in blue.

Introducing: Shares.
Playlists can now be shared - expanding and improving on our Playlink workflow and allowing for a single-source management for sharing Playlist content with different lists of recipients.
- One Playlist can be shared multiple times, creating multiple Shares that can have their own set of security and watermarking options - all tying back to one original Playlist for asset management.
- Adding or removing content from the core Playlist will update all Shares referencing this content.
| Feature | Old Playlink Experience | New Playlist Experience |
|---|---|---|
| Share content from a Playlist. |
❌ |
✅ |
| Share content from multiple folder locations. |
❌ |
✅ |
| Replace an Asset | All individual shares (playlinks) need to be edited to replace the asset. (Per Playlink management) | Editing the core playlist updates all Shares that reference it. (Per Playlist management) |
| Expiry Date | Required | Optional |
Creating a Share

To create a Share, we can select a Playlist and either
- Choosing "Create Share" from the Menu bar
- Clicking the Menu [...] button on a Playlist and choosing Share
Clicking the Share icon on the right will show us any Shares of that Playlist
"Quick Shares" Shortcut via Action Menu
You have an additional way creating a Share, thanks to the addition of our Quick Share functionality to the Action Menu.
With 2 or more assets selected, a new "Share" option becomes available, which allows you to Share assets using the same configuration options as you usually would, with fewer clicks.

These Quick Shares will also create a Playlist so that you can adjust or edit them as needed, or, re-share via a standard Share workflow. They can be found within your list of all your Playlists
Adjusting Share Settings & Recipients
To get started, our first (and typically only) piece of required information will be to select the Recipients for this Share. A Playlist can be shared multiple times, so we can tailor the settings of this Share to the specific audience who will receive it.
Recipients
This is where we start to define who will receive this Share.

We can search for a User, typing in their name or email address to show matching results from our Project Contacts. Clicking the + button will add them to the list of recipients.

We can also search for a Team by typing in the team name. Clicking on the + button will add all of the users in this team to the recipient list as individuals.
Guest Users
If we’re wanting to Share with a user who is not already in our Project Contacts (and we have the required permission to do so) we can choose the option “Add Guest”.

From here we can enter their name and email address and add them to the list of recipients.
Share Options
With our Participants selected we can then define various Options and Security settings for the Share, with many of the options we may already be familar with from our Playlink workflow available for selection.

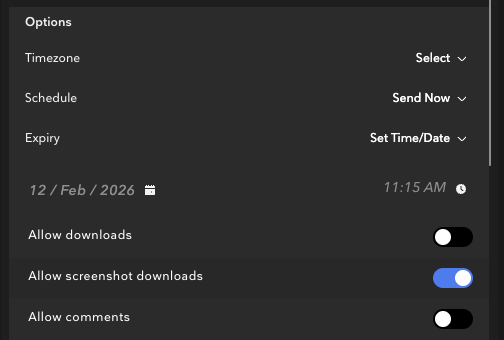
- Timezone
- This sets the timezone that will be adhered to when scheduling and/or expiring
- Schedule
- This can be set to either send right away, or scheduled to be set at a later date and time
- Send Invite at Scheduled Date
- Will only appear if "schedule" is selected
- When toggled ON (default), the notification will go out at the date/time the share is scheduled for availability
- When toggled OFF, the notification will to out right away, but the content of the share won't be available until the scheduled date and time
- Expiry
- This allows you to set the expiry date of the share, including the option to turn expiry off. The default value is 7 days from the day you're creating the share
- Allow Downloads
- Allows the recipients of this specific Share to download watermarked versions of the assets within.
- Allow Screenshot Downloads (requires Downloader+Share permission or greater)
- Allows the recipients of this specific Share to capture and download watermarked screenshots of the assets within. These screenshots will save to the user's local disk.
- Allow Comments
- Allows the recipients of this specific Share to Comment and Annotate the assets.
- By default, a User will be able to see only their own Comments/Annotations and will NOT see Comments/Annotations left by other users.
- These Comments/Annotations will then be available attached to the original assets in their original folder locations - visible to members of the prject with Folder access.
- Comments are visible to all viewers
- If you allow comments, this toggle will become clickable. Adjusting it to ON will mean that users WILL be able to see comments/annotations left by others within the inbox when reviewing the share
- Leaving this OFF (default position) will maintain default visibility as described above.
- Allow Approvals
- This will either enable or disable the Approvals interface on the Share
- Allow Offlining
- Allows the recipients of this specific Share to save the content within the Flow Capture App for iOS for Offline playback.
Share Security
Our Share Security Options allow us to define additional restrictions for the recipients of this Share.
Secure Access Type
These settings define how a user receives the content, as well as how they can access it.
Here we can choose the Share’s secure access type, as well as if they should receive an email notification in addition to their Flow Capture Inbox message.
- Highly Secure/Inbox Only
- This Share requires a Flow Capture account.
- Once received, a recipient will need to log into their Flow Capture account and play this content from their Inbox.
- This Share requires a Flow Capture account.
- Medium Secure/Link with Access Code
- This Share does not require a Flow Capture login.
- Once received, a recipient will click on a link in their Email which will take them to the Flow Capture website.
- They will then enter in the uniquely generated code to unlock and access this content.
- This Share does not require a Flow Capture login.
- Least Secure/Link without Access Code
- This Share does not require a Flow Capture login.
- Once received, a recipient will click on a link in their Email which will take them to the Flow Capture website.
- The content will then play.
- This Share does not require a Flow Capture login.
Allow participants to see other participants
- This will enable/disable the ability for participants to know who else was sent the Share
IP location restriction
- This will lock down the viewing of the share to only be possible in the first location the user views that share.
- EX: If a user views the share in the office, viewing is now restricted to that IP address (when enabled), and they would not be able to view at home etc.
- Viewing Limit
- This allows you to select how many times assets can be viewed before expiry, including the option to set it as unlimited (default)
- Admin-only access to shared status
- When enabled, only admins will be able to see the status of the share
- When disabled, anyone with access to the share can see the status of the share
Watermarking
The Watermarking settings allow us to define a specific watermark for this specific Share. This watermark will override the watermark defined at the Folder level, meaning we can make it more intense (or more relaxed) depending on the audience for this specific Share.
Changing the watermark will only affect this specific Share and will not affect users accessing the content in the Folder directly.
Once we’ve defined our settings and are happy with the results we can choose “Remember Settings” to have these options populate the next time we create a Share - handy for when we are creating multiple Shares in one session.
The following fields will be remembered:
- Security type (e.g., INBOX)
- Allow downloads toggle position
- Allow offlining toggle position
- Allow commenting toggle position
- Allow approvals toggle position
- Comments visible to all users toggle position
- IP Location Restriction
- Timezone
- Watermark selected
- Participants can see other participants toggle position
- Only admins see viewed status toggle position
- Enable view count restriction toggle position
- Max views per asset (if view count restriction is ON)
When creating/modifying a Share we can quickly tell which fields have been adjusted by the Blue icon denoting new/changed fields.
Since we can create multiple Shares from a single Playlist we could:
- Create a Share for our Director with a special watermark.
- Create a Share for our Editorial Team with the permission to download watermarked versions of the assets.
- Create a Share for the Press with intense watermarking and a playcount expiry setting.
All of these shares will connect to and reflect the same Playlist, meaning we can set up once and share multiple times.
Finalize Share
When we’re happy with how the various settings have been configured we can move into finalizing our Share.
- Close
- Cancel Creation
- Save Draft
- Save this Share as a Draft - allowing us to come back later and define additional settings before sharing.
- Send Now
- Send this Share.
Managing Shares
From Playlists
Whenever we create a new Share from a Playlist it'll appear in the Shares panel in the the righthand contextual menu.

From the Shares panel we can
- Edit/Expire a Share
- Resend the Share to All Participants
- Resend the Share to specific Participants
From Folder Permissions panel we can
- See an overview of the Folders from where we have added content in this Playlist.
- See an overview of the Permissions we have available to us in those Folders (ie. Offline, Download, Share permission)
From Shares
In the left Toolbar we’ll see a Shares section
For Users
- This offers an overview and summary of all of the Shares we have created across Flow Capture.
For Administrators
- This offers an overview and summary of all of the Shares created by all users across Flow Capture projects we administer.
Shares
- Active Shares
- Active Shares shows all shares where users still have access to content contained.
- NOTE: Any shares that are in DRAFT mode will be marked with an orange dot next to the Share name.
- Expired Shares
- Expired Shares shows all shares that have reached their expiry criteria and users no longer have access to content contained.
- Archived
- Archived Shares allows us to tidy up Expired Shares where we no longer need general visibility in our own Inbox.

NOTE: Admins on the platform will see all Shares for the Projects that they are Admins for, and will be able to edit the settings and options for each
-

When modifying these options, a blue icon denotes changes we have made.

Playlist Collaboration
Playlist Collaborators work alongside you behind-the-scenes to collate content from the Assets panel into various Playlists before the content is distributed as a Share - this way your whole team can now work to collate assets into a playlist for sharing rather than that being task being limited to an individual.
To add a collaborator to a Playlist, first, select the playlist on the left, then click the Collaborators icon on the right. From there, just click Add Collaborator.

When you do, you’ll see the Add People modal pop up, which will allow you to invite individual users, or even entire teams, to collaborate with you on creating and sharing this Playlist.

Select the user you’d like to add, then click the dropdown next to their name at the top to assign them a collaborator permission on this Playlist.

At the moment, there are three collaborator permissions: Admin, Editor, and Sharer. There is also the Owner of the Playlist, which is whoever created it first
- An Owner has full control over the playlist, including managing content and adding/updating its collaborators
- An Admin can manage and share content, but cannot add or change collaborators
- An Editor can add, remove, and organize assets within the playlist, but can’t share the Playlist with others, nor can they add or change collaborators
- A Sharer can only view and share the playlist with others
Note that only the Owner of the Playlist can add/remove other collaborators.
Once you’ve added them as a collaborator, they’ll appear underneath your own name as the Owner on the right hand side.
If they're an Admin or an Editor, they’ll also see the Playlist you’ve added them to in their Playlists section on the Assets Tab.
If they're a Sharer, they will only see a share of that Playlist in their Shares section.
To change their collaborator permission, or to remove them as a collaborator entirely, just click the dropdown and adjust as needed.

Collaborators must also have Share permission and access to the Playlist content before they are allowed to Share.
Default Collaborators
If you have specific users who you always want to add as collaborators, you can achieve this by setting them to be your Default Collaborators. These users will always be added to your Playlists going forward, with whatever level of permission you set them up as.
To add a Default Collaborator, first, browse to the Playlists section and ensure that no individual Playlist is selected.
Next, click the Collaborators icon on the right, double check that "My Default Collaborators" appears at the top, then click "Add Collaborator."
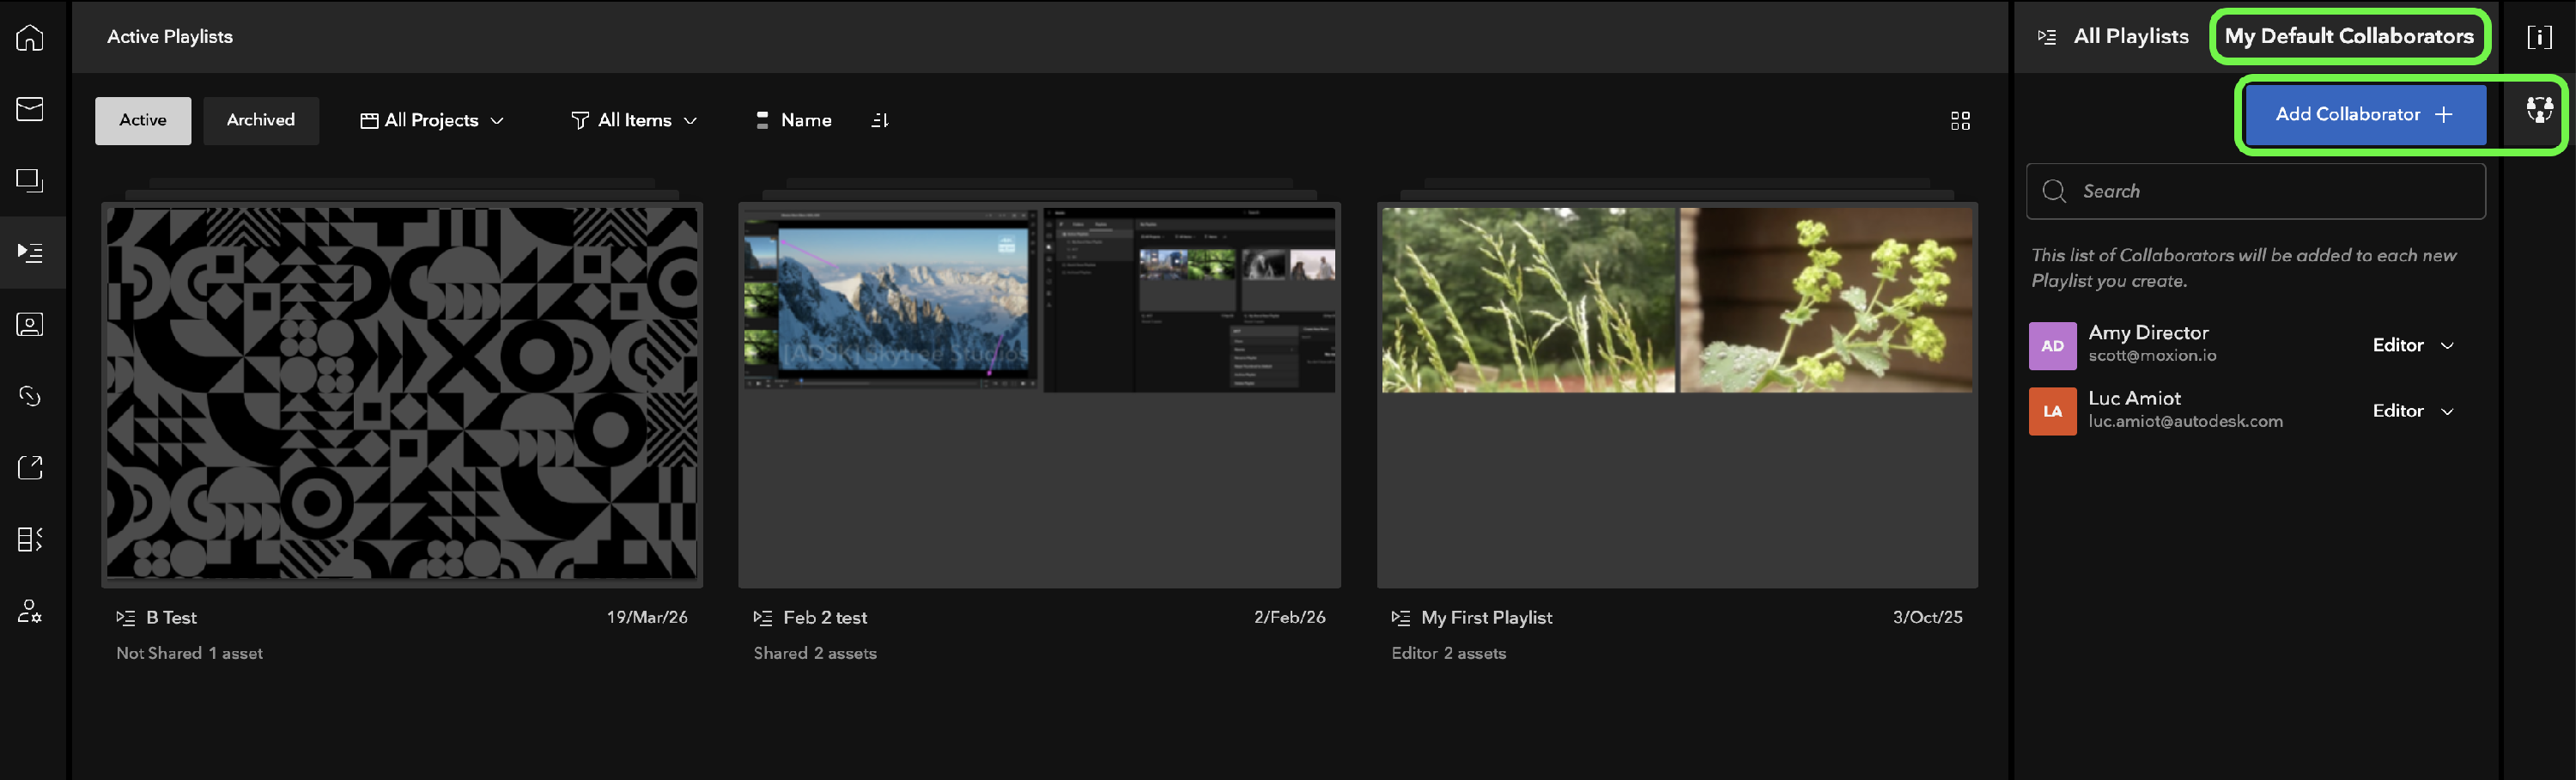
You can then select the user(s) you wish to be your default collaborators, set their default permission, and click Add. They will now be added to each Playlist as a collaborator by default.
Note that you can still add additional collaborators on a Playlist-by-Playlist basis, and you can remove default collaborators from specific Playlists as well.
Important: If you happen to be a user on Projects under different Companies, your Default Collaborators will only be applied to Playlists that are related to the Company you currently have selected when you added them as your default collaborators.
To add a different set of users as your default collaborators for Playlists under a different Company, just switch to that Company using the Company Selector and repeat the process above.
Click below to review a short Playlist Collaborator video
Shares - Download Screenshots to disk
This update introduces a new Option in the Share creation screen to allow recipients to download and save watermarked screenshots to disk.
Enabling this function on a Share means that
- Recipients have access to the in-app Screenshot button when viewing the Share.
- Screenshots taken with this button by recipients will download a frame-specific Screenshot with the appropriate Share watermark applied as burn-in before download.
- These screenshots will then be able to be handled like any other image on a user's device.
- This function is available specifically to users with Downloader+Share (or greater) permission.
- This ensures that the person authorizing this Share for screenshot downloads already has the personal permission to Download and Share assets before passing on that permission to other users via the Share.
⠀
Shares - Download Screenshots to Photos (iOS)
When given the appropriate "Allow Screenshot Downloads" permission (preview) users are now also able to download screenshots locally to the Photos app on iOS and iPadOS.
Adding to the Photos app on iOS/iPadOS requires permission to access Photos, if you decline the prompt and need to grant access again at any stage this can be done by going to Settings>Privacy & Security > Photos and applying the appropriate permission.
This feature is currently in Preview and available on an opt-in basis - for more information on enabling this functionality have your Administrator contact Flow Capture Support.